

Table of contents
❇️Kubernetes Storage
In Kubernetes, storage is used to store data persistently for applications running inside the cluster. Kubernetes provides various options for storage management, including local storage, network-attached storage, and cloud storage.
The storage resources can be dynamically provisioned or statically created in Kubernetes clusters. Kubernetes uses the StorageClass object to define the provisioner, parameters, and other settings for dynamically provisioning storage resources. The PersistentVolumeClaim object is used to claim a portion of storage from the PersistentVolume.
Some of the popular storage solutions used with Kubernetes are:
Local storage: Storage devices that are directly attached to the nodes in the Kubernetes cluster are considered local storage. Local storage can be used for storing temporary data that does not require data persistence.
Network-attached storage (NAS): NAS provides file-level storage over the network. Kubernetes supports various NAS solutions like NFS, GlusterFS, and CephFS.
Block storage: Block storage is a type of storage that provides block-level access to storage devices. Kubernetes supports various block storage solutions like AWS EBS, Azure Disk, and Google Persistent Disk.
Object storage: Object storage is a type of storage that stores data as objects, instead of files or blocks. Kubernetes supports various object storage solutions like AWS S3, Azure Blob Storage, and Google Cloud Storage.
Kubernetes provides an abstraction layer for storage management, which makes it easier for developers to manage storage resources without worrying about the underlying infrastructure.
❇️Persistent Volume and Persistent Volume Claim
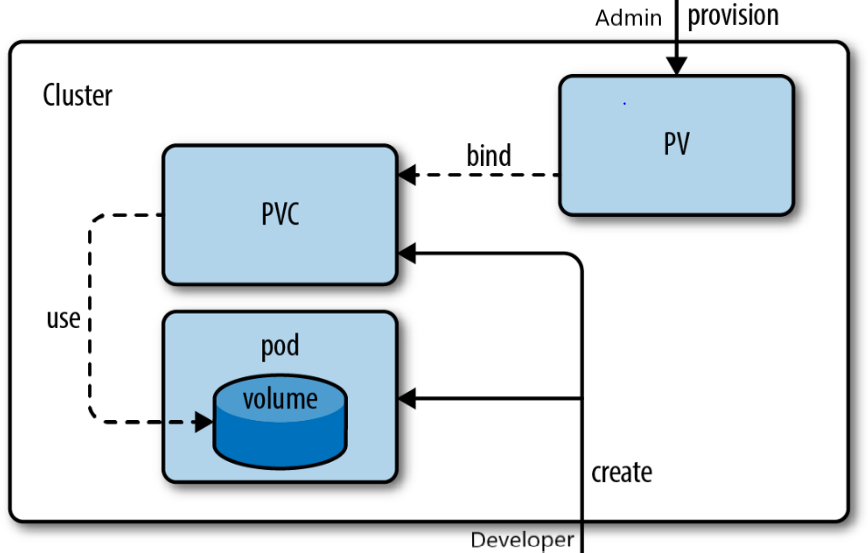
Persistent Volumes (PVs) and Persistent Volume Claims (PVCs) are Kubernetes objects that enable decoupling storage from pods. PVs represent physical storage resources such as disks or network storage while pods use PVCs to request storage from PVs.
💠Configure a Pod to Use a PersistentVolume for Storage
Create an index.html file on your Node and create PV :
sudo mkdir /mnt/data

sudo sh -c "echo 'Hello from Kubernetes storage' > /mnt/data/index.html"

#Create the PersistentVolume:
kubectl apply -f https://k8s.io/examples/pods/storage/pv-volume.yaml
#View information about the PersistentVolume:
kubectl get pv task-pv-volume
Output Should be like this :

Configuration file for the hostPath PersistentVolume:
apiVersion: v1
kind: PersistentVolume
metadata:
  name: task-pv-volume
  labels:
    type: local
spec:
  storageClassName: manual
  capacity:
    storage: 10Gi
  accessModes:
    - ReadWriteOnce
  hostPath:
    path: "/mnt/data"
The configuration file specifies that the volume is at /mnt/data on the cluster's Node. The configuration also specifies a size of 10 gibibytes and an access mode, which means the volume can be mounted as read-write by a single Node. It defines the StorageClass name manual for the PersistentVolume, which will be used to bind PersistentVolumeClaim requests to this PersistentVolume.
Create the PersistentVolumeClaim:
kubectl apply -f k8s.io/examples/pods/storage/pv-volume.yaml
Configuration file for the PersistentVolumeClaim:

apiVersion: v1
kind: PersistentVolumeClaim
metadata:
  name: task-pv-claim
spec:
  storageClassName: manual
  accessModes:
    - ReadWriteOnce
  resources:
    requests:
      storage: 3Gi
Create the PersistentVolumeClaim:
kubectl apply -f k8s.io/examples/pods/storage/pv-claim.yaml
💠Create a Pod
The next step is to create a Pod that uses your PersistentVolumeClaim as a volume.
Here is the configuration file for the Pod:
apiVersion: v1
kind: Pod
metadata:
  name: task-pv-pod
spec:
  volumes:
    - name: task-pv-storage
      persistentVolumeClaim:
        claimName: task-pv-claim
  containers:
    - name: task-pv-container
      image: nginx
      ports:
        - containerPort: 80
          name: "http-server"
      volumeMounts:
        - mountPath: "/usr/share/nginx/html"
          name: task-pv-storage
Notice that the Pod's configuration file specifies a PersistentVolumeClaim, but it does not specify a PersistentVolume. From the Pod's point of view, the claim is a volume.
#Create the Pod:

kubectl apply -f https://k8s.io/examples/pods/storage/pv-pod.yaml

#Verify that the container in the Pod is running

kubectl get pod task-pv-pod

#Get a shell to the container running in your Pod:

kubectl exec -it task-pv-pod -- /bin/bash
In your shell, verify that nginx is serving the index.html file from the hostPath volume:
#Be sure to run these 3 commands inside the root shell that comes from
#running "kubectl exec" in the previous step
apt update
apt install curl
curl http://localhost/
The output shows the text that you wrote to the index.html file on the hostPath volume:
Hello from Kubernetes storage
❇️Storage Classes in k8s
Storage Classes in Kubernetes are used to define different types of storage that are available in a cluster. They allow you to specify the characteristics of the underlying storage, such as performance, durability, and cost.
A Storage Class is defined as a YAML file that includes the following information:
apiVersion: The version of the Kubernetes API that the Storage Class uses.kind: The type of Kubernetes object that the file represents (StorageClass in this case).metadata: Information about the Storage Class, such as its name and labels.provisioner: The name of the storage provider that the Storage Class uses.parameters: Additional configuration options for the storage provider.
When you create a Persistent Volume Claim (PVC), you can specify the Storage Class to use. Kubernetes will then dynamically provision a Persistent Volume (PV) based on the characteristics specified in the Storage Class. This makes it easy to manage storage in a Kubernetes cluster and ensures that the right type of storage is allocated for each application.
There are several built-in Storage Classes in Kubernetes, such as standard, gp2, and ebs-sc1, which are provided by various cloud providers. Additionally, you can create your own custom Storage Classes to meet your specific storage requirements.
❇️Kubernetes Security
💠Role-Based Access Control (RBAC)
RBAC is a Security mechanism used in Kubernetes to control who has access to resources in a cluster. Simply put, RBAC is a way to make sure that only authorized users can perform certain actions in a Kubernetes cluster.
In RBAC, access is granted based on a user's role. A role defines a set of permissions that determine what actions a user can perform. For example, a role may allow a user to create pods, but not delete them. Roles are then assigned to users or groups, giving them the appropriate level of access.
RBAC in Kubernetes has two main components: roles and role bindings. Roles define a set of rules that determine what actions can be performed on resources in a cluster. Role bindings, on the other hand, map roles to users or groups, giving them the necessary access.
RBAC can be implemented on a per-namespace basis, which allows different sets of permissions to be defined for different namespaces. This is useful when different teams are responsible for different parts of a cluster and need different levels of access.
In RBAC, it's important to follow the principle of least privilege. This means giving users only the permissions they need to perform their tasks, and nothing more. This helps to minimize the risk of accidental or intentional misuse of resources.
In summary, RBAC is a security mechanism used in Kubernetes to control who has access to resources in a cluster. It ensures that only authorized users can perform certain actions and helps to minimize the risk of misuse of resources.
Here's an example Role in the "default" namespace that can be used to grant read access to pods:
apiVersion: rbac.authorization.k8s.io/v1
kind: Role
metadata:
  namespace: default
  name: pod-reader
rules:
- apiGroups: [""] # "" indicates the core API group
  resources: ["pods"]
  verbs: ["get", "watch", "list"]
💠Pod Security Policies (PSP) and Node Security Policies (NSP)
PSP and NSP are two different security features in Kubernetes that help improve the security of the Kubernetes cluster.
Pod Security Policies (PSP) allow administrators to set security policies that dictate what security-related actions are allowed for pods running in a Kubernetes cluster. PSP can be used to restrict what a pod is allowed to do, for example, disallowing the use of privileged containers or preventing the use of host namespaces.
Node Security Policies (NSP), on the other hand, is a feature that is aimed at securing the node itself, as opposed to individual pods. NSP can be used to restrict access to the node and to configure the node's security settings.
NSP can be used to define a set of security policies that apply to the node itself. These policies can be used to control which ports are allowed to be accessed, which users have access to the node, and which filesystem paths are accessible.
Both PSP and NSP are important security features that should be used to help secure Kubernetes clusters. By using these features, administrators can help reduce the risk of unauthorized access and other security-related issues.
💠Network security policies (NSPs)
Network security policies are Kubernetes objects that define network-level security rules for pods. NSPs can be used to restrict incoming and outgoing network traffic to pods based on specific criteria, such as source IP address, destination IP address, and protocol type. NSPs are implemented using network plugins, such as Calico, that intercept and enforce network traffic according to the rules defined in the NSPs.
💠Transport Layer Security (TLS)
TLS is a cryptographic protocol used to provide secure communication over a network. TLS is commonly used to secure HTTP traffic (HTTPS) and other application protocols, such as SMTP and IMAP. In Kubernetes, TLS can be used to secure communication between pods or between a pod and a service. To enable TLS communication in Kubernetes, you must first create a TLS certificate and key pair, and then configure your application or service to use them.
Kubernetes supports several types of TLS certificates, including self-signed certificates, certificates signed by a certificate authority (CA), and certificates signed by a cluster-wide CA. You can also use Kubernetes Secrets to store and manage your TLS certificates.
💠Secrets
A Secret is a special tool in Kubernetes that helps keep important information, like passwords or keys, safe and hidden from people who don't need to see it. It's like a private locker for your sensitive data that you can use when you're running your applications on Kubernetes. Secrets are really useful because they help keep your data secure even if someone else is looking at your code or working on your application with you. They're like a secret vault that only the right people can access!\
❇️Conclusion
In conclusion, storage is a critical aspect of Kubernetes that enables stateful applications to function properly. Kubernetes provides various storage options such as volumes, persistent volumes, and storage classes, which can be used to store data in a more persistent manner. With these storage options, applications can store data reliably and retrieve it when necessary.
Security is also a crucial aspect of Kubernetes, and it is essential to ensure that the applications running in the cluster are secure. Kubernetes provides several security features, including network security policies, node security policies, pod security policies, and TLS encryption. These features help protect the cluster from unauthorized access and data breaches.
Overall, Kubernetes provides a robust storage and security infrastructure that can be used to deploy and manage containerized applications at scale. However, it is essential to have a good understanding of these features and how to use them effectively to ensure the security and reliability of your Kubernetes cluster.